Tuesday, August 16, 2011

Mastering the Nikon D7000 – New from NikoniansPress and Rocky Nook


Mastering the Nikon D7000
Paperback: 496 pages
Publisher: NikoniansPress/Rocky Nook; 1st edition
Date: August 15, 2011
Language: English
ISBN-10: 1933952806
ISBN-13: 978-1933952802

Mastering the Nikon D7000 is a 496 page book covering every dial, switch, button, and menu item on or in the Nikon D7000 camera. It is written in an easy to understand manner, which allows the user to master their chosen camera without feeling overwhelmed in the process.

Each configuration option for the camera is discussed in complete detail, with why, how, and when to use the feature—far surpassing the user's manual. All settings are fully discussed with lots of color graphics and recommendations on how the author sets his own D7000.

Mastering the Nikon D7000 is written from the viewpoint of an experienced photographer discovering, using, and enjoying one of Nikon's most mature and powerful enthusiast cameras—and then explaining what he finds.


About the Author

Darrell Young has been an avid Nikon photographer since the early 1980s when he acquired his first Nikon, an FM. Since that time he has owned and used virtually every Nikon body, both film and digital. When a new Nikon is released, Darrell is first in line to get the new camera body. He has one of the worst cases of Nikon Acquisition Syndrome (N.A.S.) ever diagnosed—and it leads him to not only take pictures, but also write books and articles.

Darrell has been an author for Nikonians.org since 2000 and is often seen in the Nikonians.org forum and other forums around the Internet. As a technical writer Darrell's specialty is explaining complex things in everyday language. Before he writes about a camera he first fully reads the user's manual, testing each setting and noting any improvements or differences from previous Nikon cameras. He then takes the camera out into the real world, shooting nature scenics, portraits, events, and action to discover how the camera performs for each style of photography. Next, he tests the camera with various lenses, flash units, and Nikon accessories. Only then does he start writing the book about the camera. His books are based on real-world experience and knowledge.


Note to Darrell's Blog Readers

The book is available at the following links with discounted pricing:

Print edition: http://amzn.to/ie8gfV
Kindle edition: http://amzn.to/nmwCcQ
ePub, Mobi, and PDF versions: http://oreilly.com/catalog​/9781933952802/

Mastering the Nikon D7000 is in stock at Amazon.com, as of 08-14-2011. All eBook editions are already available at the links above (Kindle, ePub, Mobi, and PDF).

What Readers are Saying

James says:
 
"'Digital Darrell' Young has done it again. This author excels at taking complex subjects, and explaining them in a manner that makes them very easy to understand. In explaining the countless and complex features of this camera, I find the information to be short, sweet, and to the point.

I have been using my D7000 for 8 months preceeding the publication of this book, yet on every page I am finding important facts that I was not at all aware of prior to reading this book. The insight of the day so far? -- The minimum ISO setting on a Nikon D7000. Sure, Auto ISO lets you set a max ISO, but it wasn't until reading this book that I was aware of a minimum ISO as well! Brilliant material in this book for sure."

Cherokee Ham says:

"Darrell has stepped up to the challenge of writing a master reference on what is probably the most complex (and feature rich) camera that Nikon has produced to date. His analysis of all the options and settings of the D7000 is comprehensive, understandable, and very welcome.

I ordered the Kindle version and have read it cover to cover. It works great on both the portable Kindle and the PC Kindle. My initial reading was on the PC, where color in the menus, illustrations and photos is displayed. I plan to keep the monochrome version on my Kindle (along with the D7000 manual PDF) for handy reference when out shooting.

Darrell supplements this comprehensive reference with online information for digital SLR beginners. He does not include the basics of digital photography and digital SLRs in Mastering the D7000, because that would be another complete book. Highly recommended. in this book for sure."

B. Minor says:

"You will not be disappointed with Darrell Young's thorough coverage of the Nikon D7000. Not only does he give advice based on his excellent working knowledge of the camera's features, but also he provides his recommendations about them--how HE uses each feature.

As an extensive Nikon shooter with a collection of Nikon cameras and lenses to drool over, Darrell is the perfect expert to consult.

Also, the book is lengthy, and having the ebook version handy while learning the ins and outs of this new camera and/or going deeper into unexplored features is easier than carrying around the book. That said...I am still looking forward to owning the hard copy too! Ok, so I'm a fan...but with merit. I used Darrell's "Mastering the D90" until it was dog-eared (and still refer to it when using that camera body).

Whether you are an experienced of new photographer, this book is a must-have for the Nikon D7000."

Nikon Lady says:

"Darrell Young has done it again. Delivered a book, Mastering the D7000, with a WOW factor. I've owned my D7000 for nine or ten months, and have been using it with only rudimentary understanding of this complex, wonderful camera.

I've never been much for camera manuals. I try to find how to do something and I am referred to multiple pages, which end up just confusing me.

Mastering the D7000 explains the functions of the D7000 in language even I can understand. This book is like a blessing delivered to me. Buy it, and it will bless you."

And finally, Darrell says:

"I want to personally thank each of you that purchases Mastering the Nikon D7000. I have spent a great deal of time--along with the NikoniansPress/Rocky Nook publishing team--to give you a quality reading experience that will help you master your chosen Nikon. Inside each book is a link to my personal website and email contact address. I encourage you to contact me when you have deep questions that you would like to investigate. Often, I have had the same question and may have an answer already prepared. If not, and your question is one that others may have, I am quite willing to research and find an reliable answer. Maybe your question will contribute to the next book I write? I hope you enjoy your new camera and the book that will help you master it. Let's keep learning together!"

Keep on capturing time...
Darrell Young

Photography Basics - Understanding Your Nikon's Imaging Sensor


This article is a short excerpt from a book I am writing called, Moving Beyond Point-and-Shoot Photography: The Next Step – Learning to Use a DSLR or Interchangeable Lens Camera, due for release by Rocky Nook in the spring of 2012 in print and most eBook formats.

What is an Imaging Sensor?

In the old days of photography people used various light-sensitive chemical coatings on some sort of base material to make an image. The first real photograph was made in 1826 by a man in France named Joseph NiĆ©pce. He set up a box with a lens—called a camera obscura—in an upper-story window of his estate and put a polished pewter plate coated with an petroleum-based substance called "bitumen of Judea" inside the box. He uncapped his lens and let the light from the sunny day outside shine on his coated plate for eight hours. The sun shining though the lens exposed and hardened the sun-exposed parts of the bitumen, while areas that were darker on the image were not hardened. He then took the plate and used a solvent to remove the softer bitumen. What was left was the world’s first geniune photograph made with a camera box and lens. You can read more about this historic event and view the first image at the following web address:

http://www.hrc.utexas.edu/exhibitions/permanent/wfp/

By the 1850s photography had caught on as something enthusiasts of the time could accomplish. It was a lot of work since there was no place to buy pre-made photography supplies. The photographer had to coat his or her own base material with a light-sensitive substance and then process it later into a photograph.

As time went by photography became more and more popular. Companies stepped up and provided pre-made cameras and film to take pictures.  Now, any enthusiastic person could be a photographer. For many years the medium of photography was carried by film, either as a negative or a transparency.

In 1888 a man named George Eastman created “The Kodak Camera.” His motto was “You press the button, we do the rest.” Within a year, it became a well-known saying and photography exploded in popularity. The point-and-shoot camera was born! Following is a link to Kodak’s website where you can read about the early development of photography and film-based cameras:

http://www.kodak.com/global/en/corp/historyOfKodak/historyIntro.jhtml

Enthusiasts of the time went beyond Kodak’s method of you press the button and we do the rest. Many had what is called a darkroom, where toxic chemicals were used to “develop” the film for use and the film was placed in an enlarger for printing paper-based prints. Those were the prints of yesteryear. Enthusiasts had to work harder than photographers satisfied with the point-and-shoot method.

Around the year 1999 photography changed in a major way. Companies, such as Nikon, introduced professional digital SLR cameras. Instead of using film, the image was captured with an electronic “chip” inside called an imaging sensor. At first, the images captured did not have the resolution of film and most people didn’t take digital cameras seriously. However, by the year 2002, Nikon and Canon were releasing more consumer oriented and affordable enthusiast DSLR cameras, along with less costly point-and-shoot models. The rest is history.

The camera you now have or desire is based on digital technology. Instead of using film, chemicals in a darkroom, and an enlarger to make prints; the digital camera uses an imaging sensor to capture the image, a memory card to store the images, and an inkjet printer for prints. The whole process is more flexible, faster, yet in some ways, more complex.

How Does an Imaging Sensor  Work?

The imaging sensor size in your DSLR or ILC provides potential image quality unobtainable by even the best of the point-and-shoot cameras. Many do not realize why a large-sensored camera can make such high-quality images in comparison. Let me explain.

A CMOS chip imaging sensor found in a Nikon D7000 camera

What is a Megapixel?

All digital cameras have an imaging sensor that uses very tiny light-gathering points called pixels—an abbreviation of “picture-elements” (pix-els).  There are millions of these tiny light-gathering pixels on the imaging sensor. Each pixel captures a tiny part of the image of your subject. All the pixels working together capture the full image.

You have heard the word megapixel if you have been doing digital photography for very long. Camera companies use the megapixel rating of their cameras as a major sales point. Most people think that the more megapixels, the better the image; however, that may not be true.

The word megapixel simply means million of pixels. The size of the imaging sensor and the number of megapixels on it determine the maximum resolution (size) of the images you can create with the camera. However, there is a tradeoff in quality when too many pixels are added to a sensor. The problem with a point-and-shoot camera is that the sensor is very small and the millions of pixels are very, very tiny. That can cause some problems, as discussed in the next section.

What about Imaging Sensor Size?

To make a comparison, a point-and-shoot camera has an imaging sensor about the size of your little fingernail. Imagine cramming millions of pixels into a space the size of your little fingernail. Those pixels are so small that they’re not very light sensitive. For a point-and-shoot camera to make a good picture, especially in lower light levels, the power must be turned up on the pixels. That degrades the image by introducing stray spots or graininess in the image, called noise.

You know how static sounds when you turn up a radio to hear a station that is slightly out of range. The static is noisy sound that degrades your radio-listening experience.

Digital image noise is similar to static on a radio, except it is visual. Noise is random specks of grainy-looking dark or light colors that were not in the scene you photographed. Noise is one of the reasons people realize they need better cameras and move into the DSRLor ILC world.

You may remember what noise looks like in images you’ve taken with your old point-and-shoot camera in darker ambient light conditions. The grainy look of the images was not pleasant, was it? A point-and-shoot camera has a much harder time making high quality images because there are too many pixels crammed into too small an imaging sensor size. If you have a point-and shoot camera with 14 megapixels, that means the camera manufacturer packed 14 million pixels onto a tiny little imaging sensor. Noisy images are the result!

On the other hand, a DSLR or ILC has an imaging sensor nearer the size of a big postage stamp. That’s quite a difference! The same number of pixels put into a larger sensor area means the pixels can be much larger and can gather light much more efficiently. The images from your DSLR can be  sharper; and have better color, contrast, and dynamic range ( how much light range from dark to light its sensor can capture).
  
The DSLR/ILC’s photos can be enlarged more efficiently and with higher quality. You’ll be amazed at the difference and so will your friends and family.

If you already have a camera, check its user’s manual to see what size imaging sensor it uses. The larger the sensor, the bigger the pixels can be, and the higher the potential quality of the image it captures. Point-and-shoot cameras have tiny pixels and lower image quality, DSLR/ILC cameras have bigger pixels and better image quality.Pixel size is a strong determining factor in image clarity and lack of noise. As discussed previously, the larger the pixel, the better it can gather light. Sometimes more megapixels is not the best thing for your photography. If a camera manufacturer comes out with a new model with “even more megapixels” and they haven’t increased the size of the imaging sensor—beware!

When there are millions of extra pixels jam-packed into even a larger DSLR/ILC sensor, the pixels must be smaller in order to fit the available space on the sensor. When the pixel size approachs the size of a point-and-shoot camera’s pixels, image degradation can result.

Thankfully, camera manufacturers are usually balanced about this and don’t push the pixel sizes down too far. They know noise will result and people will be unhappy. There was one major camera manufacturer who recently reduced the number of pixels in one of its cameras because people were complaining about noise.

Just don’t be fooled by the hype in advertising. The number of pixels is an important factor in maximum image size, and the size of the pixels is an important factor in maximum image quality.  Just be aware of the trade off between the size of the sensor and the number of pixels. More megapixels can sometimes make for a lesser quality image. Interesting, huh?

Keep on capturing time...
Darrell Young

Saturday, August 13, 2011

What is Photography About, Anyway?


A while back, I was talking with a fellow website owner who writes excellent articles on photographic technique. He is non-camera specific and just concentrates on how to make beautiful images with any camera.

He asked me if he could post one of my Nikon hardware articles on his website. Since it was a high-quality website, I said he could. A few weeks later he contacted me and said that my article was getting very high usage on his site. He then wrote a few articles on camera hardware. To his surprise, the articles on camera equipment were being read 4-to-1 over his articles on photographic technique.

That made me think! What is photography about, anyway?

Are we, as photographers, simply collectors of fine cameras? Or, do we actually use those cameras once we get them? Why do articles on hardware pull better readership than articles on technique? I've been puzzling over this issue for several days and have come to some conclusions. Let me go back in time first though...

When I first started in SLR photography, back in 1979 or so, I had a basic manual 35mm SLR with only a light meter, a shutter speed dial, and an aperture control. I learned how the camera worked in a few days of taking pictures and then concentrated on technique. I learned to see a good composition by actually taking pictures and reading a lot of good books. I didn't read more than one or two books on camera hardware, though. Mostly, I read about technique.

My first Nikon was an FM. It was a fully manual camera. Then, I later bought a Nikon FE, which added an A-Mode for Automatic (aperture priority mode). I could set it on A-Mode, then all I had to do was adjust the aperture and the camera set the shutter speed. Really cool! My next major upgrade was to a Nikon F4. This camera had a lot more dials and buttons. So, I studied the manual and gradually learned about its P, S, A, and M modes. Next came the Nikon F5, D100, D200, D300, and finally now, the Nikon D7000.

The Nikon D7000 has nearly 1000 menu screens!

My Nikon D7000 has all the exposure modes that my Nikon FM, FE, F4, and F5 did. It also has user settings, custom settings, picture controls, white balance, sharpness, hue, JPEG, TIFF, NEF, color spaces, an ISO range, noise control, contrast control, a buffer, various frame speeds, autofocus modes, AF-area modes, release modes, flash modes, histograms, bracketing, an intervalometer, spot metering, 3D matrix metering, center-weighted metering, iTTL, HDMI, D-Lighting, live view, scene modes, D Lenses, G Lenses, DX Lenses, non-CPU Lenses, focus-tracking, movie mode, memory cards, menu and information screens, and sooooo much more!

My conclusion...

I think I know why people are reading camera how-to articles 4-to-1 over technique articles. It is simply because our cameras are so complex that it takes weeks or months of study to understand even a portion of their capabilities. And, by the time we understand our cameras really well, a new one is beckoning us. And, of course, the new camera has about 25 more features to digest than our current one.

The benefit of this complexity is that we can walk up to a subject, attempt a good composition, and get a good exposure 99 percent of the time. We have to think less about the exposure. In trade we have to become computer scientists to understand our cameras.

Where is a digital Nikon FM? Why can't we go back in time to a simple camera with a single meter, a shutter speed dial, and an aperture control? Couldn't a nice digital sensor be substituted for the film? Maybe they could call it the Nikon DM. Digital Manual SLR!

Look, I am over 50 years old now and I miss the "good old days." I long for the time when my kids were little, my wife and I were slim and fit, and cameras were simple.

Do any of you, my readers, feel these same emotions?

Keep on capturing time...
Darrell Young

Thursday, August 11, 2011

Is Digital Image Manipulation a Lie?


"Film tells the truth!" "What you see is what you get." "A transparency or negative contains a true record of reality." "You just can't trust a digital image!"

These are strong statements, but reflect the feelings of many film purists. On the other hand, people using digital imaging speak of the ease with which their digital cameras—and later their computers with Photoshop—allow them to adjust an image until it looks like what they saw when they took the photograph.

One photographer I know is unhappy with digital imaging because his images often lack the initial "snap" or contrast that a well-exposed Velvia slide exhibits. He refuses to adjust the digital images in any way, since that would alter the "reality" of the subject. He is a purist, and feels that his film images reflect a pureness of reality that no digital image can attain. Many others feel the same way he does.

A clearly manipulated digital image – Is this wrong?

So, is digital a lie, just because one can modify the image in many ways, in-camera, and in-computer? Let's consider a few points often overlooked by those concerned about digital image reality.

First, we'll look back many years to a time before photography as we know it. Think about the time of the oil painting as a means to record and remember people, places, and things. The artist, as a purist, would do his or her best to record a scene in an accurate way. A beautiful landscape would flow through the eyes and from the artist's fingers onto a canvas. Later, someone familiar with the real scene could attest that the painting was an accurate rendition of the reality. But, it was, nevertheless, an artist's rendition, not the reality. The artist would mix paints until they closely represented the color of the sky, trees, water, and objects. But, were they exact colors? Close, maybe, but not the exact same as the reality. It would be virtually impossible to capture the colors of light in the pigments of oil paint.

And then, as a paid artist, would you accurately paint the features of a rich client somewhat past the bloom of youth? Or, would you be inclined to leave out a few facial lines, darken the hair, and slim down the figure a bit? Would your brush allow you enough resolution to record the finest details in your subject? Probably not. As a purist, you might want to accurately reflect reality, but you would have various limitations in your ability to do so. You would do your best to make the image reflect what you saw when you made the painting, within the limitations imposed by the recording medium. But you, as the artist, would make the final decision as to the outcome of your image. It would tend to reflect your own sight and feelings.

Moving on up a few years to the birth of photography, consider the advent of recording a scene on chemically coated metal or glass plates and finally onto paper. At first, the images were made in black & white. If a photographer wanted to capture an image closer to reality, he or she would have had to take the picture, then use paint or pencils to colorize the image. Many fine images were made by those methods, but they were limited by the lack of real color and the interpretation of the photographic artist's feelings about the image. Later, real color photography came into being, and results moved closer to reality. Purism was more possible. But, think about it a bit. Which reflects more reality, a black & white print, or a Velvia transparency? Does either really represent reality? How often is reality not captured by the film medium due to limitations within the medium itself? How about 99 percent of the time?

Originally in color but converted to black and white

No black & white print contains reality, since we live in a colorful world. But, many proponents of black & white would argue that shooting without color makes one focus on the subject in a more intense way. Black & white images truly can be moving, can't they? But, in no way can it be argued that things really look that way to a normal human. The black and white images simply represent an interpretation of reality as seen by the photographer. But, what about color prints and slides? Don't they capture color in a way that reflects the reality of the scene? In a word...NO! As pure as the photographer may feel, the very film one uses changes the scope of reality. Ektachrome presents a beautiful image, as does Velvia. But, side by side each of them contains interpretations of reality as seen by the film manufacturers. Each shows the image in a different way and with different colors. Many photographers use a certain film for a specific type of photography, and change to another film for a different type.

If you are a portrait photographer, still using film, do you often use a hard edged colorful film like Velvia to take pictures of your clients? Not if you want to stay in business. Velvia is one of the sharpest films ever created, so it will show every line, wrinkle, gray hair, and bulge of your subjects. And the skin colors with Velvia do not reflect reality. So, instead many use films like Fuji NPS portrait film that is softer in focus, and much less colorful. Some photographers even go so far as to use lenses that deliberately defocus the image, so that a flattering image can be made of almost anyone. Not much reality there!

But, what if one is a nature photographer, where skin tones don't matter so much. Do you use Fuji NPS Portrait film to take pictures of those colorful flowers, birds, and landscapes? Not likely, since NPS does not "pop" the colors like Velvia does. Why is Velvia one of the most popular films ever invented? Is it because it accurately records the colors of the subjects? No way! Velvia saturates greens and reds and blues in a way that makes nature images look really great. Pure and accurate, no. Beautiful, yes! Each film manufacturer promotes their film for its specific interpretation of reality. As a photographer, a great many choices of emulsions give you films that reflect your feelings. But, each renders reality in a different way.

Have you ever put a filter on your camera? Ooops, you just bent reality. That polarizer that is omnipresent on your lenses for landscape photography changes the truth. Have you ever used a graduated neutral density filter to allow you to capture a landscape with dim ground and bright skies? Your eyes can see the full range of light, the reality, but the film can't contain it. So you have to modify the truth by holding back the brightness of the sky.

Did you ever use a faster film so that you could get detail in your image when there is less light? Of course you have. Your eyes can see the darker reality, but your slow film can't.

And we have arrived at the main point.

In all the things we have considered, everything is a manipulation of the reality. No medium can possibly reflect the reality of the images our eyes see. We have to use the tools we have available to create a copy of the image we saw with our own eyes. We all have different feelings about the images we capture, and use different means to capture them. The images become our own version of reality.

Light through a window – fine art reality?

With a digital camera, the tools to interpret what we see are in great abundance. And later, in the computer, with imaging programs like Photoshop or Lightroom, even more flexibility is available. In the camera, we can change the color balance from image to image to better reflect what we see. We can change the light gathering power of the camera by upping the ISO at any time. We don't need various film emulsions, because we can change the saturation levels of the color, either in the camera, or in the computer. We don't need neutral density filters. Instead, we can hold back the bright sky by taking two pictures, one of the sky, and one of the ground, then combining them with a computer into one image that reflects as much reality as we can muster. Is that bad? Is that a lie?

No it isn't! In fact, with a digital camera it is possible to capture the purest forms of visual reality that can be captured with any technology, including film. Only the eye can do it better.

But, what about digital photographers who choose to remove a distracting light spot, some ugly weeds, or a limb from an image. Is that bad? What if a digital photographer uses the "healing brush" and other tools in Photoshop to remove a blemish from a person's face or darken the hair of a portrait subject? Are these things bad? Well, that's up to you. If persons who shoot only film had the opportunity to do so, would they not take it? Of course they would, and did, and do, every day in wet darkrooms around the world. Wet prints often do not reflect the reality of the subject; it is just much harder to accomplish the manipulation.

There will always be "purists" who insist that only the camera should be allowed to make an image—nothing should be changed in the computer—and then they take their lovely images to the lab where they select the finest grade of paper so that their version of reality can be more easily seen. But, which version of the reality are they printing? The Velvia version, or the Provia version, or maybe even the Agfa version?

Do you get my point? Reality is relative to the creator of the image, and the tools he or she uses. And, it is completely open to the interpretation of the photographer/artist. With my digital camera and computer, I can make an image look the way I want it too and it's pretty easy to do so.

So, then, should we not use digital photography because it is relatively easy to remove flaws from images or even add things that weren't even in the original image? No, again, because an unethical yet skilled person can manipulate images in the wet darkroom or by sandwiching slides. If one chooses to be dishonest, there's always a way to further the dishonesty. Whether paintings, film, or digital is used to capture images, reality can and will be bent to the interpretation of the artist. That is life and the true reality!

A new form of expression arrived with the advent of digital photography. A joyous way to make images that either closely reflect your memory and feelings or wildly distort the images in any way you choose. Just because it is easier to manipulate reality doesn't mean that ethical people will suddenly become liars. In a way, those who feel snooty about older methods are rather insulting to honest digital photographers. In my opinion, digital photography has opened doors of self-expression to all of us. We now have the ability to control the creative process from the time we press the shutter, until we print our image out on nice archival paper for the next generation to gain joy from.

Don't try overly hard to be a purist, because, in reality it is impossible to do it. No matter what one does with a camera, reality cannot be accurately captured; only one's interpretation of it. But, if you insist on purism, please realize that digital imaging actually allows one to capture images more accurately than film does. Do not turn digital down, just because some will be dishonest and "create" things that never were. If you decide to modify your image, simply caption it accordingly, and go "make" some more images.

Release the artist within yourself. Don't believe the lie that digital photography "manipulation" is somehow wrong—other than in photojournalism where accuracy matters. Digital manipulation is merely a tool to be used by honest people to make some of the best images they'll ever experience. With a digital camera and knowledge of Photoshop, you will create images that are the greatest truths that ever flowed from within you. Release your ability with very few limitations. Use your digital camera to capture saturated pieces of time. Your children and their children will remember you for it.

Keep on capturing time...
Darrell Young

Tuesday, August 9, 2011

Photography Basics - Reciprocal of Focal Length Shutter Speed Rule

This article is a very short excerpt from a book I am writing called, Moving Beyond Point-and-Shoot Photography: The Next Step – Learning to Use a DSLR or Interchangeable Lens Camera, due for release by Rocky Nook in the spring of 2012 in print and most eBook formats.


There is an important principle in photography that we should discuss, especially if you are shooting with a DX sensor. It is called the reciprocal of focal length shutter speed rule and affects the sharpness of your images. This impressive sounding rule simply means that you should use a tripod (no handholding) whenever the shutter speed in use is below the reciprocal of the lens’s focal length. What does that mean?

Simply that whatever the focal length (e.g., 18mm, 35mm, 50mm, 105mm) of the lens (or zoom position) in use, the shutter speed should not go below the same number as that focal length. In other words, if you are using a 50mm zoom position on your lens, you should not use a shutter speed below 1/50s without having the camera on a tripod. With a 105mm focal length the minimum handheld shutter speed is 1/100s or 1/125s—there is no 1/105s available, so you can use the closest one. If you are using a 300mm lens, you should not use a shutter speed below 1/300s.

Male Cardinal - Nikon D2X, Nikkor 80-400mm lens at 400mm, 1/250th of a second at f/5.6, on a tripod

The reason this rule exists is because a longer focal length (zoomed all the way out) tends to magnify the subject and any vibrations you introduce while pressing the shutter-release button.

With a shutter speed below the reciprocal of the lens focal length you can introduce movement into the camera just from your heart beat, reflex mirror slap in a DSLR (that clunking sound when you fire the shutter), or natural hand shakiness. If you are going to handhold images at slower shutter speeds, you need to learn how to brace yourself properly. The best thing is to use a tripod any time you have to shoot below the reciprocal of the lens’s length. Otherwise, you will be known for your well exposed, yet blurry images (from camera shake).

Today’s vibration reduction (optical stabilization) lenses and camera bodies will help control camera shakiness, so it is a good idea to use those lenses or cameras when possible.

With lenses using vibration reduction, an element in the lens moves to compensate for minor movements or vibrations of the camera. With camera bodies having built-in vibration compensation, the camera’s imaging sensor moves to counter vibrations. Technology is improving our ability to shoot handheld shots at slower shutter speeds; however, it is still best to use a tripod for maximum quality at slow shutter speeds.

The size of the camera’s imaging sensor affects the reciprocal of focal length shutter speed rule. The smaller the sensor, the more a longer lens magnifies vibrations. In today’s cameras there are various sensor sizes: from full frame (which is the approximate size of a frame of 35mm film from the old days) to 4/3rds (which is one of the smallest in a DSLR or ILC). We discussed sensor sizes in an earlier chapter.

If your camera is using an APS-C, DX, APS-H, 4/3rds, or comparable size sensor, you need to be extra wary of handheld vibrations. Instead of using the reciprocal of the lens’s length (50mm = 1/50s), you should use 1.5x the reciprocal. In other words, if your lens’s zoom postion is at 60mm, instead of using 1/60s, it may be better to use a minimum of 1/80s, or 1/100s (1.5x would be 1/90s, which is not available). The smaller sensor with a longer lens position tends to magnify the vibrations even worse.

When in doubt, use a tripod for maximum sharpness!

Assignment: 

Part 1: Using shutter priority mode (S or Tv), take some pictures of quickly moving subjects, such as cars passing on a road (be careful to not look threatening). Use various shutter speeds from 1/30s to 1/1000s. Examine the pictures on your computer and see which shutter speeds stopped the action. Which left a lot of blur? Which left only a little blur?

Part 2: Set the shutter speed to 1/125s and try following the subject with your lens as it moves (panning) while firing multiple images. Use high-speed continuous shutter release mode (see your camera’s users manual) so that you can fire multiple shots while holding down the shutter release button. Examine how those pictures look on your computer monitor. Do you have an sharp images of the moving subject? Does the background have an interesting look, as if you can see motion in it? Do moving parts of your subject have blur, but not the rest of the subject? Panning with a medium shutter speed can provide very interesting, implied motion subjects.

Part 3: Set your camera up on a tripod outside next to a water faucet. Turn on the faucet and take pictures at 1/1000s, 1/125s, 1/15s, and 1s. Examine the images on your computer monitor and see what the different shutter speeds do to the water’s look. Does the water appear agitated and frozen at 1/1000s? Less so at 1/125s, normal looking at 1/15s, and wispy at 1s? Try this same thing at a stream the next time you are near one with cascades or waterfalls. Do you like the way water looks at 1/15s or do you prefer 1s?

Keep on capturing time...
Darrell Young

Monday, August 8, 2011

Using Nikon's File Naming and File Number Sequence in a Clever Way

File naming on the Shooting Menu allows you to control the first three letters of the file name for each of your images. The default is DSC, but you can change it to any three alphanumeric characters provided by the camera.

I'm sure that you can come up with all sorts of clever ways to use these first three images to personalize the storage of your image files. Each member of my family with Nikon DSLRs use their initials in the first three characters of the image file. Later it is obvious who took each picture. You may have something else in mind now that you are learning about the File naming system.

The camera defaults to using the following File naming for your images:
  • sRGB color space: DSC_1234
  • Adobe RGB color space: _DSC1234
According to which Color space you are using, the camera adds an underscore character to the end of the three DSC characters in sRGB, or to the beginning in Adobe RGB, as shown in figure 1, image 2—where I've already renamed the first three characters of the file name to my initials DY, according to the method discussed in this article.

Figure 1 – File naming on a Nikon D300S's Shooting Menu
Here are the steps to set up your custom File naming characters (figure 1):

  1. Select File naming from the Shooting Menu.
  2. Use the Multi Selector to scroll through the numbers and letters to find the characters you want to use.
  3. Press the Multi selector center button to select and insert a character (the buttons used may vary with some Nikons, see your camera's user's manual).
  4. To correct an error, hold down the checkered Thumbnail/playback zoom out button and use the Multi Selector to scroll to the character you want to remove. Use the garbage can Delete button to delete the bad character.
  5. Press the OK button to save your three new custom characters. They will now appear at the beginning of each new image file name.
Now you've customized your camera so that the image names it creates reflects your personal needs.

I use this feature on my camera in a special way. Since the camera can count images in a File number sequence that continues from 0001 to 9999, I use File naming to help me personalize my images. The camera cannot count images higher than 9999. Instead, it rolls back over to 0001 for the 10,000th image. (See Custom setting d Shooting/display > File number sequence, usually Custom setting d7 or d8, discussed in the next section of this article.)

When I first got my camera, I changed the three default characters from DSC to 1DY. The “1” tells me how many times my camera has passed 9999 images, and “DY” are my initials, thereby helping me protect the copyright of my image in case it is ever stolen and misused.

Since the camera’s image File number sequence (see next section) counter rolls back over to 0001 when you exceed 9999 images, you need a way to keep from accidentally overwriting images from the first set of 9999 images you took. I use this method:
  • First 9999 images: 1DY_0001 through 1DY_9999
  • Second 9999 images: 2DY_0001 through 2DY_9999
  • Third 9999 images: 3DY_0001 through 3DY_9999
See how simple that is. The above numbers show a range of 30,000 images. Since many Nikons are tested to over 100,000 images (some more), you will surely need to use a counting system like this one. My system only works up to 89991 images (9999 x 9). If you wanted to start your camera at “0” instead (0DY9999), you could count up to 99990 images.

If Nikon would ever give us just one extra digit in our image counter, we could count in sequences of just under 100,000 images, instead of 10,000 images. I suppose that many of us will have traded on up to the next Nikon DSLR before we reach enough images that this really becomes a constraint. On my Nikon D2X that I've used since 2004, I’m now close to 40,000 images.

This is merely the way I'm using this useful feature in my D300S, D7000, D90, and D2X. If my method doesn’t work for your needs, you could use the three characters to classify your image names in all sorts of creative ways.

File Number Sequence Used with File Naming

A related function to File naming is Custom setting d Shooting/display > File number sequence (usually d7 or d8). This Custom setting function works along with File naming to let you control how your image files are named. If File number sequence is set to Off, the camera will reset the 4-digit number—after the first three custom characters in File naming—to 0001 each time you format your camera’s memory card. I set File number sequence to On as soon as I got my camera so that it would remember the sequence all the way up to 9999 images. I want to know exactly how many pictures I've taken over time.

To enable File number sequence, set it to On using the following Custom Setting Menu screens (figure 2).


Figure 2 – File number sequence on a Nikon D300S's Custom Setting Menu (Custom setting number may vary on various Nikons, but usually are near d7)
Here are the steps and screens used to configure File number sequence (figure 2):

  1. Select d Shooting/display from the Custom Setting Menu and scroll to the right (see figure 2, image 1).
  2. Highlight File number sequence and scroll to the right (see figure 2, image 2).
  3. Choose one of the three choices on the list. In figure 2, image 3, On has been selected. 
  4. Press the OK button to lock in the setting.

My Recommendation: I discussed how I use these three custom characters in the beginning of this article. You may want to use all three of your initials, or some other numbers or letters. Some will even leave these three letters at their default of DSC. I recommend at least using your initials so that you can easily identify these images as yours. With my family of four Nikon shooters it sure makes it easier for me! If you use my method, just be sure to watch for the images to roll over 9999 so that you can rename the first character for the next sequence of 9999 images.

I heartily recommend that you set File number sequence to On. After much experience with Nikon DSLR cameras, and many years of storing thousands of files, I’ve found that the fewer number of files with similar image numbers, the better. Why take a change on accidentally overwriting the last shooting session when copying files on your computer, just because they have the same image numbers?

Additionally, I like to know how many pictures I’ve taken with each camera. Since I use the Shooting Menu > File naming function to add three letters reflecting the current number of times my camera has rolled over 9999 images (e.g., _1DY9999.NEF, _2DY9999.NEF, or _3DY9999.NEF), I’m better able to determine how many images I’ve taken with the camera. I just have to be careful to change the 1DY to 2DY when the image File number sequence rolls over from 9999 to 0001.


Keep on capturing time...

Darrell Young

Friday, August 5, 2011

Photography Basics – Exposure Control Relationship Illustrated

This article is a very short excerpt from a book I am writing called, Moving Beyond Point-and-Shoot Photography: The Next Step – Learning to Use a DSLR or Interchangeable Lens Camera, due for release by Rocky Nook in the spring of 2012 in print and most eBook formats.

Let’s begin our examination of how the three main exposure controls (aperture, shutter speed, and ISO sensitivity) relate to each other, with an illustration. Think about the faucet in your kitchen you use to fill a glass with water. There are four things you are using while you fill the glass, as follows:

  1. The water
  2. The faucet with a hole on the end where the water runs out
  3. The handle that controls how long the the water flows out
  4. The glass you are filling with water and its capacity

Figure 1 – Water flow controls compared to camera light flow controls (Water = Light)

As shown in figure 1, let's directly compare the concept of filling a glass with water (getting a nice drink) to taking a picture (getting a nice exposure):

  1. Water = light: The water satisfies your need for a drink in a similar way to how the light satisfies your desire for a good exposure.
  2. Faucet nozzle = aperture: The camera’s aperture is like the nozzle of the faucet where the water comes out. The size of the faucet’s opening controls how much water volume can flow into the glass in the same way the aperture opening controls how much light volume can get to the camera’s imaging sensor. A large aperture opening, such as f/2.8 lets in more light than a small aperture opening (f/11).
  3. Faucet handle = shutter speed: The camera’s shutter speed is like the handle of the faucet. The handle controls how long the water runs into the glass in the same way the shutter speed controls how long the light hits the camera’s imaging sensor. A slow shutter speed (1/60th of a second) lets light come in for a longer time than a fast shutter speed (1/500th of a second).
  4. Glass = camera’s imaging sensor: The glass is like your camera’s imaging sensor. It is a container for water, like your camera’s sensor is a container for light. To satisfy your thirst, the glass should be full of water, not half full, and not running over. In the same way, the camera’s imaging sensor should have a full exposure, not underexposure, and not overexposure. The capacity of the glass controls the amount of water it will hold. If you use a large glass, it will hold more water, while a smaller glass holds less water. The ISO sensitivity is like the capacity of the glass. A low ISO sensitivity (ISO 100) will only gather a little light, in the same way a small glass will only gather a little water. A high ISO sensitivity (ISO 400 and above) is like using a large glass to collect more water (light).

This basic concept is how the camera’s exposure controls are related to one another. Similar to how the faucet controls manage water flow, the camera controls manage light flow.

Keep on capturing time...
Darrell Young

Which Color Space Should I Choose?


Color spaces are an interesting and important part of digital photography. They help your images fit into a much broader range of imaging devices. Software, printers, monitors, and other devices recognize which Color space is attached to your image and use it, along with other color profiles, to help balance the image to the correct output colors for the device in use.

The two Color spaces available on Nikon cameras have different gamuts, or ranges of color. They are called sRGB and Adobe RGB. You’ll find the color space choices on the Shooting Menu, as shown in Figure 1.

Figure 1 – Choosing a Color space from the Shooting Menu

Adobe RGB uses colors from a broader selection of the total color range, so it has a wider gamut. If you are taking images that might be printed, Adobe RGB is often the best color space to use.

After a JPEG file is created, either in a camera or on a computer, both Adobe RGB and sRGB’s color gamut are compressed into the same number of color levels. A JPEG has only 256 levels for each of its red, green, and blue (RGB) channels. However, since the Adobe RGB color space takes its colors from a wider spectrum, you will have a better representation of reality when there are lots of colors in your image.

If you shoot in RAW format a lot, you may want to consider using Adobe RGB to store the maximum number of colors in your image files for later use. Remember that a NEF (RAW) image file can contain 4,096 levels of color per RGB channel in 12-bit mode and 16,385 levels in 14-bit mode—instead of the limited 256 levels in an 8-bit JPEG. Using Adobe RGB makes a lot of sense in NEF (RAW) mode because of its capacity to contain more colors as a base storage medium.

There are some drawbacks to using Adobe RGB, though. The sRGB color space is widely used in printing and display devices. Many local labs print with sRGB because so many point-and-shoot digital cameras use that format. If you try to print directly to some inkjet printers using the Adobe RGB color space, the colors may not be as brilliant as with sRGB. If you aren’t going to modify your images in post-processing and plan to print them directly from your camera, you may want to use sRGB. If you shoot only JPEGs for computer display or Internet usage, it might be better to stay with sRGB for everyday shooting.

If you are a RAW shooter and regularly post-process your images, you should consider using Adobe RGB. You will have a wider gamut of colors to work with and can make your images the best they can be. Later, you can convert your carefully crafted images to sRGB print with a good color profile and get great results from inkjet printers  and other printing devices. Here’s a rough way to look at it:

  • Many JPEG shooters use sRGB.
  • Many RAW shooters use Adobe RGB.

This is not a hard and fast rule, but many people use these settings according to their style of shooting.


Which Color Space Is Best—Technically?

There is a large color space used by the graphics industry called CIE LAB. This color space is designed to approximate human vision. Adobe RGB covers about 50 percent of the CIE LAB color space, and sRGB covers only 35 percent. In other words, Adobe RGB has a wider gamut. That means Adobe RGB gives your images access to significantly higher levels of color, especially cyans (bluish tones) and greens. Another important consideration if you’ll send your work to companies that use offset printing—such as book and magazine publishers—is that Adobe RGB maps very well to the four-color cyan, magenta, yellow, black (CMYK) printing process. If you are shooting commercial work, you may want to seriously consider Adobe RGB. Stock photo shooters are nearly always required to shoot in Adobe RGB.


My Recommendation

I use Adobe RGB most of the time since I shoot a lot of nature pictures with a wide range of color. I want the most accurate color my camera can give me. Adobe RGB has a wider range of colors, so it can be more accurate when my subject has a wide range of colors. However, if you are shooting JPEG snapshots, there’s no need to worry about this. Leave the camera set to sRGB and have fun.

Keep on capturing time...
Darrell Young

Thursday, August 4, 2011

Understanding Nikon’s Three Light Metering Systems


The basis for a Nikon DSLR’s exposure meter is an RGB sensor that meters a wide area of the frame. When used with a G or D Nikkor CPU lens, the camera can set exposure based on the distribution of brightness, color, distance, and composition. Most people leave their cameras set to Matrix metering and enjoy excellent results. Others use the Center-weighted meter, or the Spot meter. Let's look more closely at each of the Nikon exposure meters.


3D Color Matrix II Meter

Nikons use a 3D Color Matrix II metering system that is one of the most powerful and accurate automatic exposure meters in any camera today. It uses the symbol shown in Figure 1. Look in your manual to see how to set the camera to Matrix metering. This is the default setting from the factory.

Figure 1 – Matrix metering symbol in a D300S Control Panel. This symbol will also be found on the monitor when you press the Info button and look for the metering symbol.


There are characteristics for many thousands of images stored in the camera. These characteristics are used—along with proprietary Nikon software and complex evaluative computations—to analyze the image that appears in your Viewfinder. The meter is then set to provide very accurate exposures for the majority of your images.

A simple example of this might be a picture where the horizon runs through the middle of the image. The sky above is bright and the earth below is much dimmer. By evaluating this image and comparing it to hundreds of similar images in the camera's database, an exposure setting is automatically input for you.

The Matrix meter examines four critical areas of each picture. It compares the levels of brightness in various parts of the scene to determine the total range of exposure values. It then notices the color of the subject and its surroundings. If you are using a G or D CPU lens, it also determines how far away your lens is focused so that it can figure the distance to your subject. Finally, it looks at the compositional elements of the subject.

Once it has all that information, it compares your image to tens of thousands of image characteristics in its image database, makes complex evaluations, and comes up with a meter value that is usually right on the money, even in complex lighting situations.


Center-Weighted Meter

If you were raised on a classic center-weighted meter and still prefer that type, your Nikon's exposure meter can be transformed into a flexible center-weighted meter with a variable-sized weighting that you can control. Examine the user's manual for instructions on setting the camera to Center-weighted metering.

Figure 2 – Center-weighted metering symbol in a D300S Control Panel. Look for this symbol on the monitor too, when you have selected Center-weighted metering.

The Center-weighted meter examines the entire frame, but concentrates most of the metering in an small circle in the middle of the frame. If you'd like, you can make the circle as small as 6mm or as large as 13mm (may vary with some Nikons). Let’s examine the Center-weighted meter more closely.

Using the Custom setting b Metering/exposure called something similar to Center-weighted area, you can change the size of the circle where the camera concentrates the meter reading. If you'd like, you can even completely eliminate the circle and use the entire Viewfinder frame as a basic averaging meter.

As mentioned previously, the circle in your Viewfinder is normally 8mm. However, by using the Custom setting b - Center-weighted area, you can adjust this size to one of the following (may vary with different Nikons):

  • 6mm (.24 inch) 
  • 8mm (.32 inch)
  • 10mm (.39 inch)
  • 13mm (.51 inch)
  • Avg – Entire Frame

The Center-weighted meter is a pretty simple concept. The part of your subject that's in the center of your camera's Viewfinder influences the meter more than the parts closer to the edges of the frame.

Where's the Circle?

You can't see any indication of a circle in the Viewfinder, so you'll have to imagine one.

Figure 3 – Series of imaginary red circles in the viewfinder and averaging full frame 

Here's how (see figure 3): Locate your current AF point in the middle of your Viewfinder. The length of the little rectangle you see is about 2 or 3mm (.10–.12 inch) in size. If you imagine about three of these little rectangles side-by-side, that's about the same size as the default 8mm circle, which at .32 inches is about 1/3 of an inch. The 13mm maximum size circle, at .51 inches, is about 1/2 inch wide.

Primarily, just remember that the center area of the Viewfinder provides the most important metering area and you'll do fine. For information on fine-tuning Center-weighted metering, refer to the section titled “Fine Tune Optimal Exposure – Custom Setting b6” in chapter 4, Custom Setting Menu.

What about the Averaging Meter?

If you set your meter to Avg in Custom setting b Metering/exposure > Center-weighted area (full averaging), the light values of the entire Viewfinder are averaged to arrive at an exposure value. No particular area of the frame is assigned any greater importance (figure 3, image 5).

This is a little bit like Matrix metering, but without the extra smarts. In fact, on several test subjects, I got remarkably similar meter readings from Avg and Matrix. Matrix should do better in difficult lighting situations, since it has a database of image characteristics to compare with your current image, and it looks at color, distance, and where your subject is located in the frame.


Spot Meter

Sometimes no other meter but a spot meter will do. In situations where you must get an accurate exposure for a very small section of the frame, or must get several meter readings from different small areas, the camera can, once again, be adjusted to fit your needs. Look into the user's manual for instructions on setting the camera to Spot metering.

Figure 4A – Spot metering symbol in a D300S Control Panel. Also check the monitor after setting the camera to Spot metering mode.

The Spot meter consists of a 3mm circle surrounding the currently active AF point (figure 4B). The Spot meter evaluates only 2 or 3 percent of the frame, so it is indeed a "spot" meter. Since the spot surrounds the currently active AF point, you can move the Spot meter around the Viewfinder within the AF points in your camera’s viewfinder.

FIG 4B – Viewfinder view of the 3mm spot in a Nikon D300S
How big is the 2 or 3mm spot? Well, the Spot meter barely surrounds the little AF point rectangle in your Viewfinder. It is rather small! When your camera is in Spot meter mode, and you move the AF point to some small section of your subject, you can rest assured that you're getting a true spot reading.

In fact, you can use your Spot meter to determine an approximate range of light values in the entire image. You can do this by metering the lightest spot in the frame and the darkest spot. If this value exceeds 5 or 6 stops difference in light level, you've got to decide which part of your subject is most important to you and meter only for that part. Something is going to blow out.

On an overcast day, you can usually get by with no compensation since the range of light values is often within the recording capability of the sensor. On a bright sunny day, the range of light exceeds what your sensor can record by as much as two times. This range can often be as large as 12 stops total, while your sensor can only record a maximum of 6 or 7 stops!

Don't let the numbers make you nervous. Just remember that spot metering is often a trade-off. You trade the ability of the camera's multiple "averaging" skills to generally get the correct exposure throughout the frame, for the highly specific ability to ensure a certain portion of an image is "spot-on". The choice is yours, depending on the shooting situation.

If you spot-meter the face of a person standing in the sun, the shadows around that person will contain little or no data. The shadows will often come out as solid black in the final image. If you spot-meter for the shadows instead, the person's face is likely to blow out to solid white. We'll discuss this in more detail in a later section of this chapter when we explore the Histogram.

Use your Spot meter to get specific meter readings of small areas on and around your subject, make some exposure decisions yourself, and your subject should be well exposed. Just remember that the Spot meter evaluates only for the small area that it sees, so it cannot adjust the camera for anything except that one tiny area. Spot metering requires some practice to learn how to use it well, but it is a very powerful tool to balance exposure values in your images.


My Conclusions

Most people use Matrix metering most of the time. In my experience, few people use the Center-weighted meter. However, for those raised on that type of meter, Nikon gives you a choice. Spot metering is very useful to take careful control of the exposure when you need detailed control.

Learn to use all three meter types and you can make an intelligent choice when the time comes to change to a different style of meter.

Keep on capturing time…
Darrell Young

Tuesday, August 2, 2011

Selecting a Nikon Speedlight Flash Unit


Nikon makes several Speedlight units that work very well with your Nikon DSLR camera. I have used the SB-400, SB-600, SB-700, SB-800, and SB-900 Speedlights extensively. There are also the R1C1 flash units (SB-R200), which are designed to be used in small groups, such as for a ring-light arrangement.

Let’s consider each of the current Nikon Speedlights, along with basic information on the unit’s guide number, lens coverage, and how to view detailed specification information on Nikon’s website.


Nikon SB-900 Speedlight

I really enjoy using the Nikon SB-900 Speedlight unit. It is very powerful and easy to use in the CLS arrangement because it has external controls for setting remote mode. It can also be used as a CLS commander when needed.

The SB-900 is now Nikon’s flagship Speedlight. It has adjustable beam width that goes wider and farther than most of the flash units. It has a big, detachable diffuser that really helps control hotspots and contrast. Plus, it has an included filter system that communicates with the flash unit.

The Nikon SB-900 Speedlight – Nikon's Flagship Flash Unit
The controls and menus on the SB-900 are very easy to use; much easier than the previous flagship flash, the SB-800. One perceived drawback: The SB-900 unit is such a powerhouse that it can overheat if fired rapidly, caused by allowing the batteries to get hot from heavy current drain. For that reason it has a built-in temperature sensor that will prevent the flash from being fired when it gets too hot. This sensor can be enabled/disabled in the camera’s menu. Many photographers leave it disabled so that the flash will not shut off when hot. That could be a problem in events like a wedding. Of course, if you shoot so hard and fast that your flash unit bursts into flames, I suspect that the warranty will be void!

So far, my use of the flash has not caused it to get too hot, and I’ve shot all sorts of events, so this may not be a real problem for most. There is a firmware upgrade that addresses this issue to some degree. However, some have chosen to seek out the older flagship SB-800, which does not suffer from this percieved issue.

I have both flash units and like them both very well. I use the SB-900 now more than the SB-800 because I love the extra reach the narrow beam width gives me, and I shoot a lot of wide angle group shots. The extra-wide zoom position the SB-900 provides really makes a difference. Plus, I love that big white diffuser!

Official SB-900 Guide Number Information

  • 34m/111.5ft. (at ISO 100, 35mm zoom head position, in FX format, standard illumination pattern, 20°C/68°F) to 48m/157.5ft. (at ISO 200, 35mm zoom head position, in FX format, standard illumination pattern, 20°C/68°F)

Official SB-900 Lens Coverage

  • 17 to 200mm (FX-format, Automatic mode) 
  • 12 to 200mm (DX-format, Automatic mode) 
  • 12 to 17mm (FX-format, Automatic mode with built-in wide-angle panel deployed) 
  • 8 to 11mm (DX-format, Automatic mode with built-in wide-angle panel deployed)

Built-in Wireless Commander Mode for Nikon CLS 

  • Wireless Commander Mode offers wireless control at the master Speedlight position, controlling up to 3 remote Speedlight groups and an unlimited number of compatible Speedlights. 
  • Four wireless channel options help manage wireless conflicts in multi-photographer environments.

Nikon Official SB-900 Website Address
http://www.nikonusa.com/Nikon-Products/Product/Flashes/4807/SB-900-AF-Speedlight.html


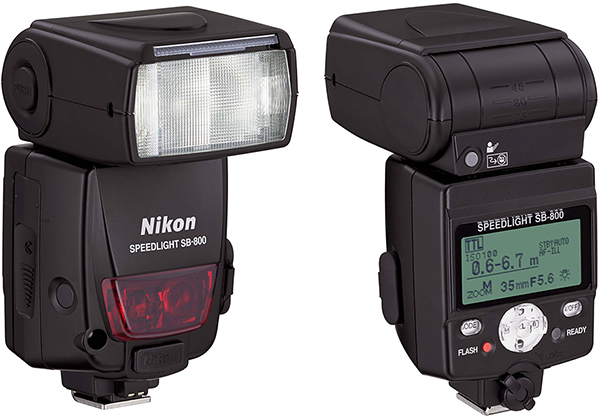
Nikon SB-800 Speedlight

The SB-800 Speedlight unit is similar in power to the SB-900 and has the ability to be a CLS commander too. The SB-800’s controls are more difficult to adjust than the SB-900’s controls because the settings are buried in menus. I’ve used these successfully for several years.

The SB-800 Speedlight – Nikon's Previous Flagship Flash Unit
The SB-800 is out of production but still in very high demand due to the perceived heating issue with the SB-900. You can sometimes buy them as new old stock on Amazon.com or eBay, but be prepared to pay a large amount of money. As this book was going to print, I saw a new old stock SB-800 on Amazon.com for over $850. Will the SB-700 or SB-900 replace the desire many have for the SB-800?  Time will tell!

Official SB-800 Guide Number Information

  • 38m/125ft. (at ISO 100, 35mm zoom-head position, 20°C/68°F) to 53m/174ft. (at ISO 100 and 105mm zoom-head position, 20°C/68°F)

Official SB-800 Lens Coverage

  • 24 to 105mm (Automatic mode)
  • 14 to 17mm (Automatic mode, with built-in wide flash adapter (14mm with SW-10H Diffusion Dome)

Built-in Wireless Commander Mode for Nikon CLS 

  • Control as many as 3 remote groups (A, B and C) of an unlimited number of compatible Speedlights with the SB-800's wireless Commander mode.

Nikon Official SB-800 Website Address
http://www.nikonusa.com/Nikon-Products/Product-Archive/Flashes/4801/SB-800-AF-Speedlight-.html


Nikon SB-700 Speedlight

The SB-700 is one of Nikon’s latest Speedlight units, having been released after the SB-900. It seems destined to replace the lower-cost SB-600. It has a built-in wireless commander mode, allowing it to be a controller in the Nikon Creative Lighting System (CLS).

The SB-700 Speedlight
The unit has a nice zoom range on its flash head, reaching out to the coverage of a 120mm lens. It also covers the wide end well, with the equivalent coverage of a 14mm in DX format, and a 24mm in FX. It’s quite a desirable flash unit for its power level and lower cost over the SB-900. The external controls on the flash make it significantly easier to use than its cousin the SB-600, which has many functions buried in menus.  Consider this flash if you are on a budget, yet need excellent power and coverage.

Official SB-700 Guide Number Information

  • 28m/92ft. (at ISO 100, 35mm zoom head position, in FX format, standard illumination pattern, 20°C/68°F) to 39m/128ft. (at ISO 200, 35mm zoom head position, in FX format, standard illumination pattern, 20°C/68°F)

Official SB-700 Lens Coverage

  • 24 to 120mm (FX-Format)
  • 14-120mm (DX-format)

Built-in Wireless Commander Mode for Nikon CLS 

  • Wireless Commander Mode controls up to 2 remote Speedlight groups and an unlimited number of compatible Speedlights. When used as a remote speedlight up to 3 Groups can be selected. 
  • Four wireless channel options help manage wireless conflicts in multi-photographer environments.

Nikon Official SB-700 Website Address
http://www.nikonusa.com/Nikon-Products/Product/Flashes/4808/SB-700-AF-Speedlight.html


Nikon SB-600 Speedlight

The Nikon SB-600 Speedlight unit is the low-cost flash for users on a budget. It is only about one stop less powerful than the SB-900 or SB-800 unit and costs considerably less.

The Nikon SB-600 Speedlight
Buying several of these won’t set you back much and will allow you to set up a great CLS system with your D7000. If you are just getting started in CLS, these might be your best investment. The SB-600 does not have a built-in Commander mode itself, like the SB-700, SB-800, and SB-900, but you don’t need it since your D7000 does.

Hurry though, if you plan to buy one or more SB-600 units; the SB-600 will probably be phased out now that the SB-700 is on the market.

Official SB-600 Guide Number Information

  • 30m/98ft. (at ISO 100, 35mm zoom-head position, 20°C/68°F) to 42m/138ft. (at ISO 200, 35mm zoom-head position, at 20°C/68°F)

Official SB-600 Lens Coverage

  • 24 to 85mm (Automatic mode)
  • 14mm to 85mm (Manual Mode, with built-in wide-flash adapter)
  • 24mm to 85mm (Manual Mode)

Built-in Wireless Commander Mode for Nikon CLS 

  • None – but does have a remote (slave) mode for use in groups under Nikon CLS control.

Nikon Official SB-600 Website Address
http://www.nikonusa.com/Nikon-Products/Product/Flashes/4802/SB-600-AF-Speedlight.html


Nikon SB-400 Speedlight

The SB-400 is Nikon’s answer to those who need an economical—yet quite powerful—stand-alone flash unit.  Its small size belies its impressive reach and power.  I often use my Nikon D7000 as a backup camera during event shooting. I find that this little SB-400 and the D7000’s AUTO exposure mode will give me excellent images without thinking about exposure. What else can one ask from a camera/flash combo in fast shooting conditions?

The Nikon SB-400 Speedlight
I’ve shot several weddings with the SB-400 on the D7000, as a backup camera and flash combo, and this little baby is a firecracker. Why buy some aftermarket flash unit, when you can own a genuine Nikon for about US$120. While not a contender for using within the Nikon CLS system, due to its lack of CLS compatibility, the SB-400 is a great standalone flash with plenty of power for a reasonable price!

Official SB-400 Guide Number Information

  • 21m/69ft. (at ISO 100, 18mm zoom-head position, 20°C/68°F) to 30m/98.4ft. (at ISO 200, 18mm zoom-head position, 20°C/68°F)

Official SB-400 Lens Coverage

  • As wide as 18mm on Nikon DX-format digital SLR cameras and 27mm on FX format.

Built-in Wireless Commander Mode for Nikon CLS 

  • None (no remote mode either). This is a stand-alone flash unit not to be used in groups.

Nikon Official SB-400 Website Address
http://www.nikonusa.com/Nikon-Products/Product/Flashes/4806/SB-400-Speedlight-Unit.html


Nikon SB-R200 Speedlight

Then there are the SB-R200 Speedlight units. These are primarily designed to use in special arrangements on brackets that Nikon created for them. These flash units are not really designed for use in a camera’s Accessory shoe. Instead, they have a special foot made to mount to special brackets, as shown in the picture of the Nikon D7000 with the SX-1 circular bracket mounted to the lens’s front with two SB-R200 flashes.

The Nikon SB-R200 Speedlight and D7000 with the SX-1 ring bracket
You’ll see these Speedlights in use if you watch many crime dramas on TV because the investigators often use them for close-up flashes of crime scene evidence. They are normally used in a group arrangement, including special mounting brackets, with a Nikon SU-800 Wireless Speedlight Commander Unit. The SU-800 is discussed next.

Official SB-R200 Guide Number Information

  • 10m/33ft. (at ISO 100) to 14m/46ft. (at ISO 200)

Official SB-R200 Lens Coverage

  • 24mm; 60° (vertical) and 78° (horizontal)

Built-in Wireless Commander Mode for Nikon CLS 

  • None – but does have a remote (slave) mode for use in groups under Nikon CLS control.

Nikon Official SB-R200 Website Address
http://www.nikonusa.com/Nikon-Products/Product/Flashes/4805/SB-R200-Wireless-Speedlight.html


Nikon SU-800 Wireless Commander Unit

While not a Speedlight flash, I wanted to show you the Nikon SU-800 Wireless Speedlight Commander Unit (see figure 4E). This unit can be used when you need extra range or need to control more than two banks of flash units—it can control three.  The SU-800 can control slave flash units up to 66 feet away, where most Speedlights with a Commander mode can only control out to 33 feet.

The Nikon SU-800 Wireless Commander Unit
It uses wireless infrared signals to control the flash banks. It is mounted onto the Accessory shoe of your camera, thereby precluding the use of the built-in flash.

Official Nikon Key Features

  • Functions as a wireless commander for the SB-R200, SB-900, SB-800, SB-700 and SB-600 Speedlight units.
  • Controls an unlimited number of Speedlights for up to three groups.
  • Provides wireless control up to 66 feet.
  • Offers 4 independent channels for competitive shooting environments.
  • Built-in AF assists illuminator for critical focus in low-light situations.

Nikon Official SU-800 Website Address
http://www.nikonusa.com/Nikon-Products/Product/Flashes/4794/SU-800-Wireless-Speedlight-Commander.html

Keep on capturing time...
Darrell Young